Table of contents
Introduction
Ready to create your own game with some action-oriented gameplay?
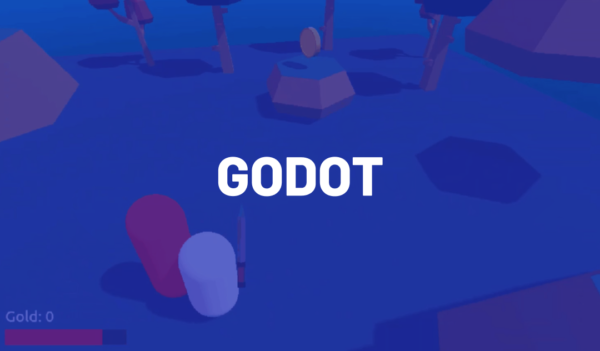
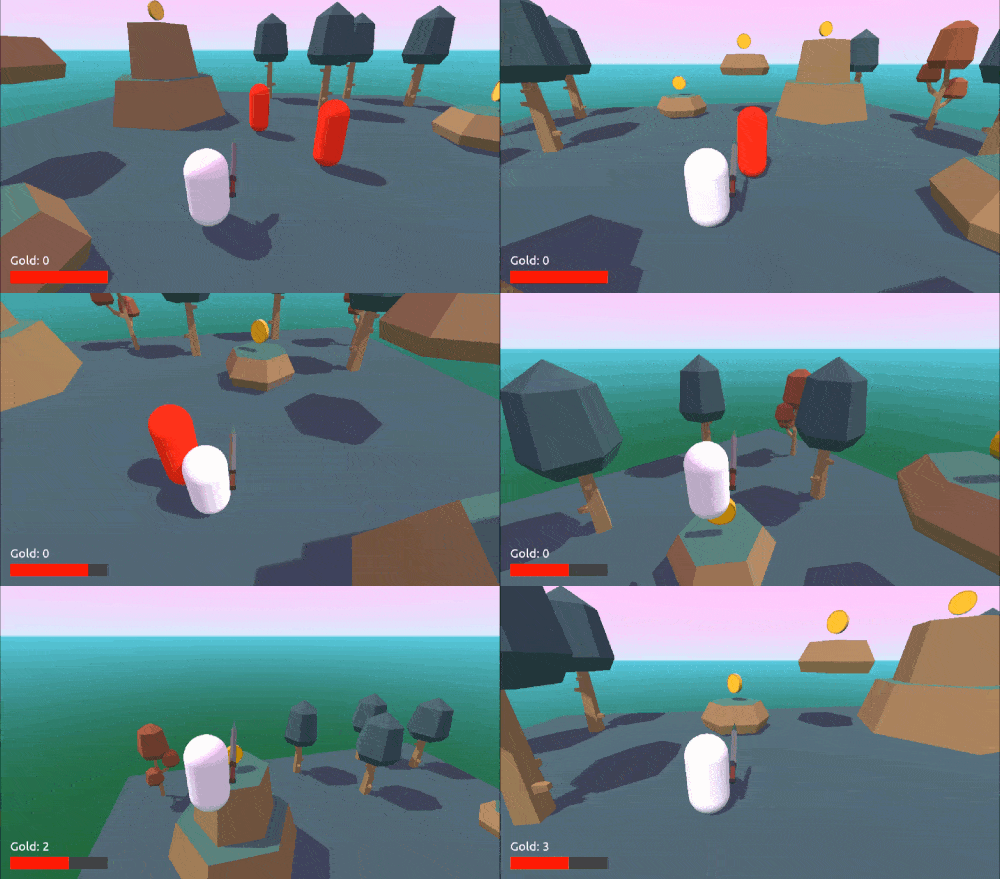
In some of our previous tutorials, we covered making a 3D FPS and a 2D RPG. Both are well-loved genres in the gaming industry and have a lot to offer players in terms of entertaining experiences. However, what if you wanted a 3D RPG or maybe something with a little more spice to it? For this tutorial, we’re going to delve into just that and show you how to make a 3D, action RPG in the Godot game engine.
This 3D action RPG tutorial will cover a lot of ground, including how to make:
- A third-person player controller
- Enemies who follow and attack the player
- Melee combat system
- Collectible coins
- UI to show our health and gold
If that sounds great to you, we hope you sit back and are eager to create your own action RPG from scratch!
Before starting, please note that this tutorial won’t be going over the basics of Godot. If this is your first time learning the engine, make sure to check out the introductory tutorial first.
Want to jump straight to making enemies and combat? You can try out Part 2 instead!
Project Files
In this course, we’re going to be using a few models and a font to make the game look nice. You can, of course, choose to use your own, but we’re going to be designing the game with these specific ones in mind. The models are from kenney.nl, a good resource for public-domain game assets. Then we’re getting our font from Google Fonts.
Did you come across any errors in this tutorial? Please let us know by completing this form and we’ll look into it!

FINAL DAYS: Unlock coding courses in Unity, Godot, Unreal, Python and more.
Project Setup
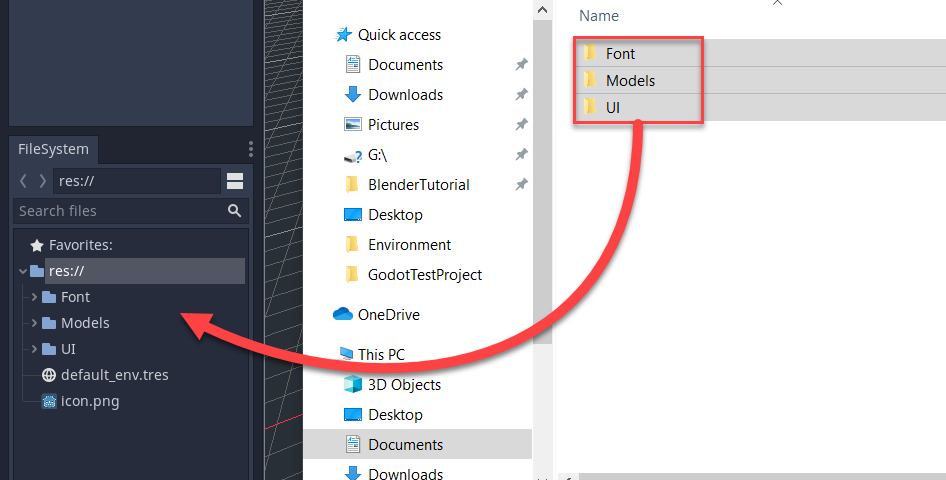
To begin, let’s create a new Godot project. First, we’re going to import the assets we’ll need.
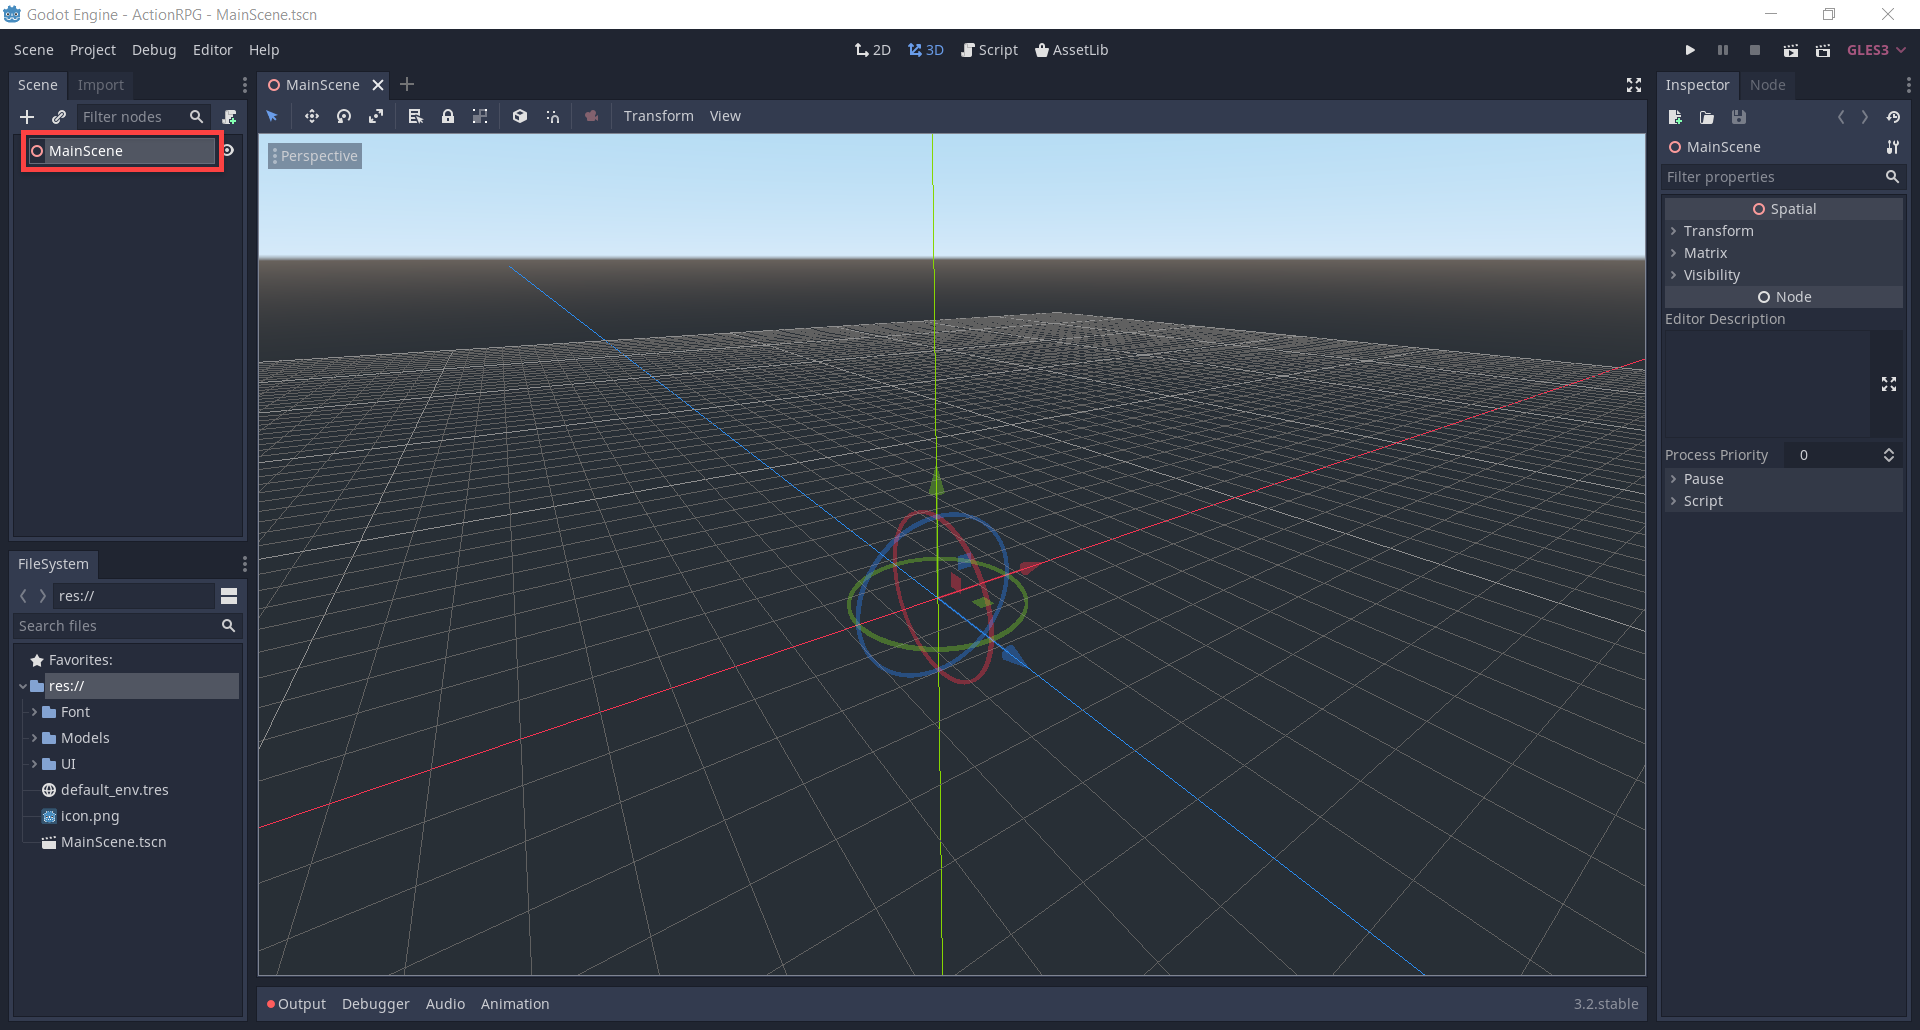
In the scene panel, select 3D Scene as our first root node. Rename the node to MainScene and save it to the file system.
You’ll see that we’re in 3D mode here. In 3D, we have Spatial nodes. These are like Node2D‘s, but allow us to position, rotate and scale them in 3D space. Below you’ll see we have a few different colored lines.
- Blue line = Z axis
- Red line = X axis
- Green line = Y axis
Creating Our Environment
Here in the MainScene, we’re going to start off by creating our environment.
- Drag in the naturePack_001.obj model to create a new MeshInstance node
- Set the Translation to -15, 0, 15
- Set the Scale to 10, 1, 10
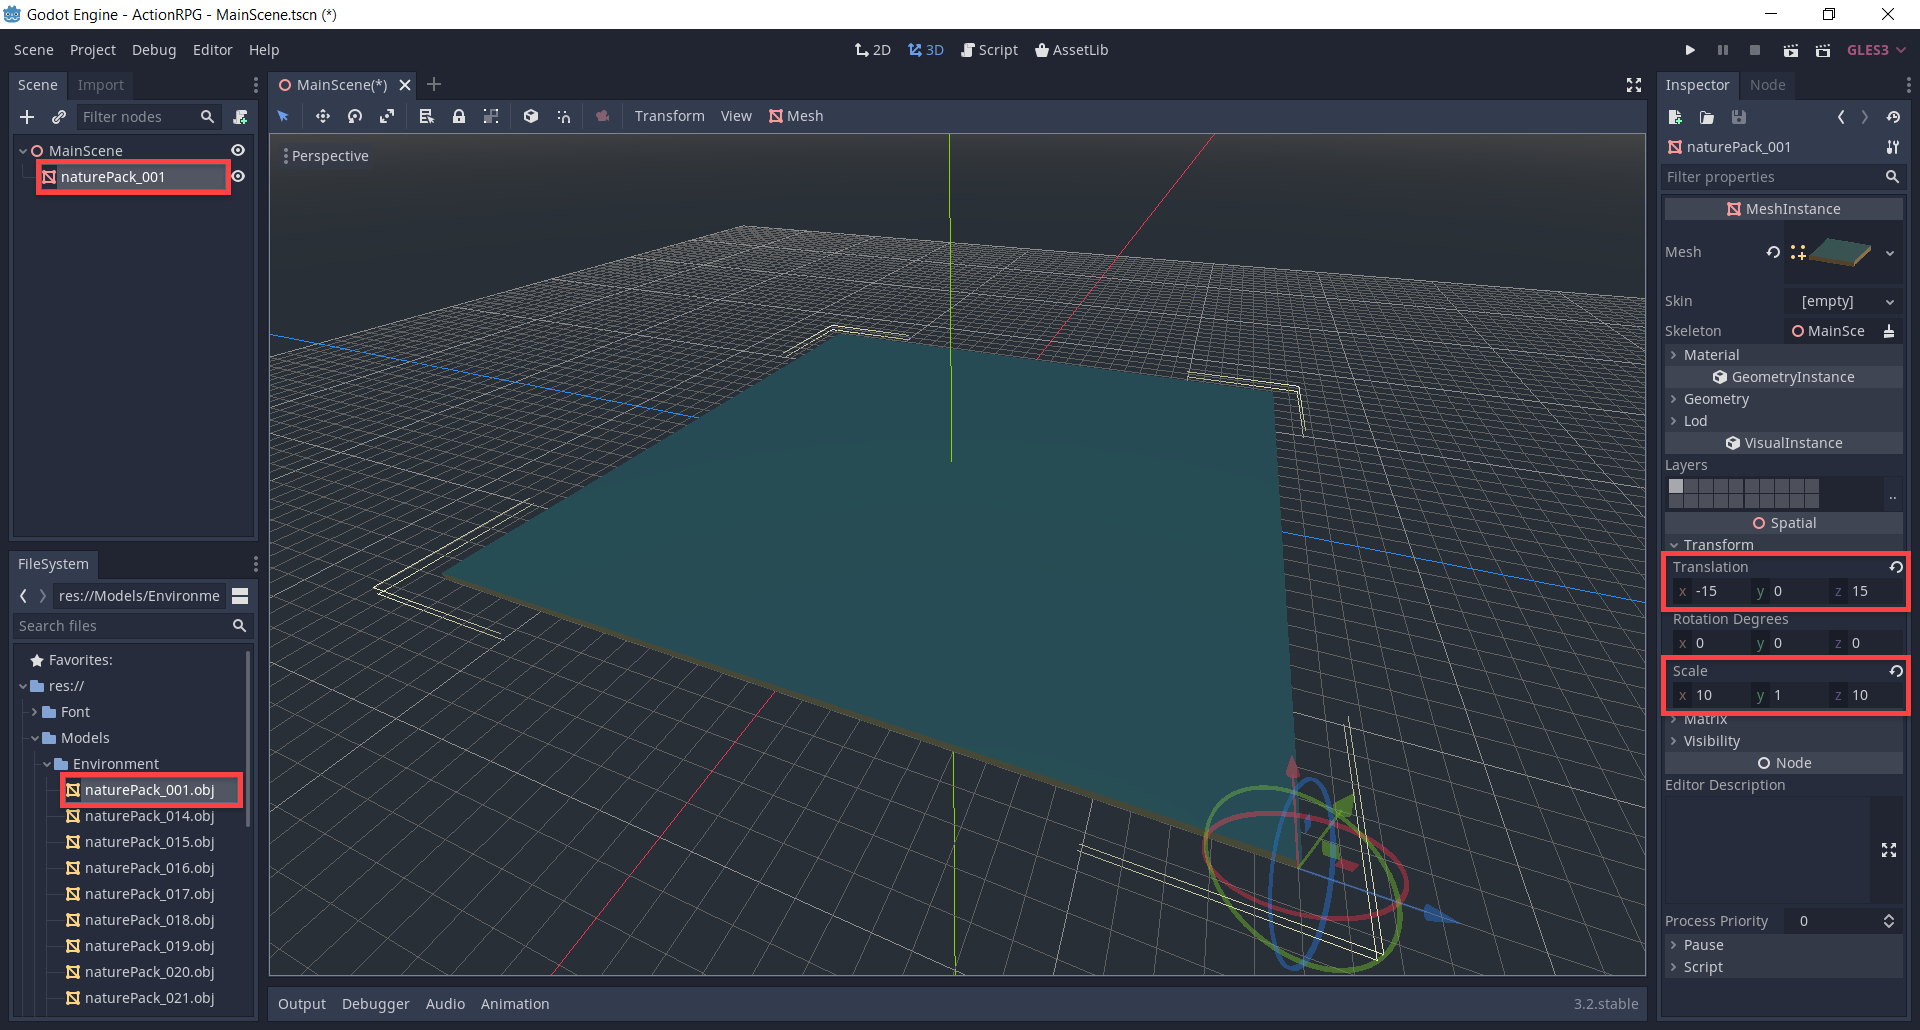
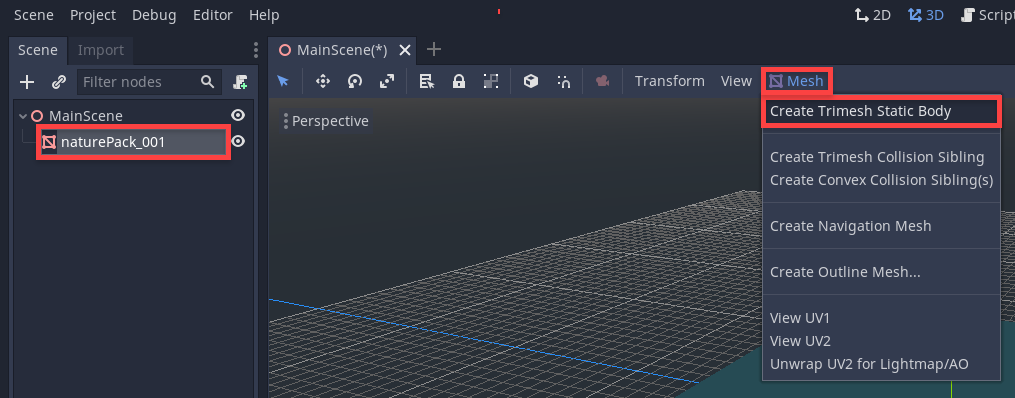
This is going to be our ground but we have one problem. There’s no collider on the model so we’re going to fall through it. To do this quickly, we can…
- Select the node
- Select Mesh > Create Trimesh Static Body
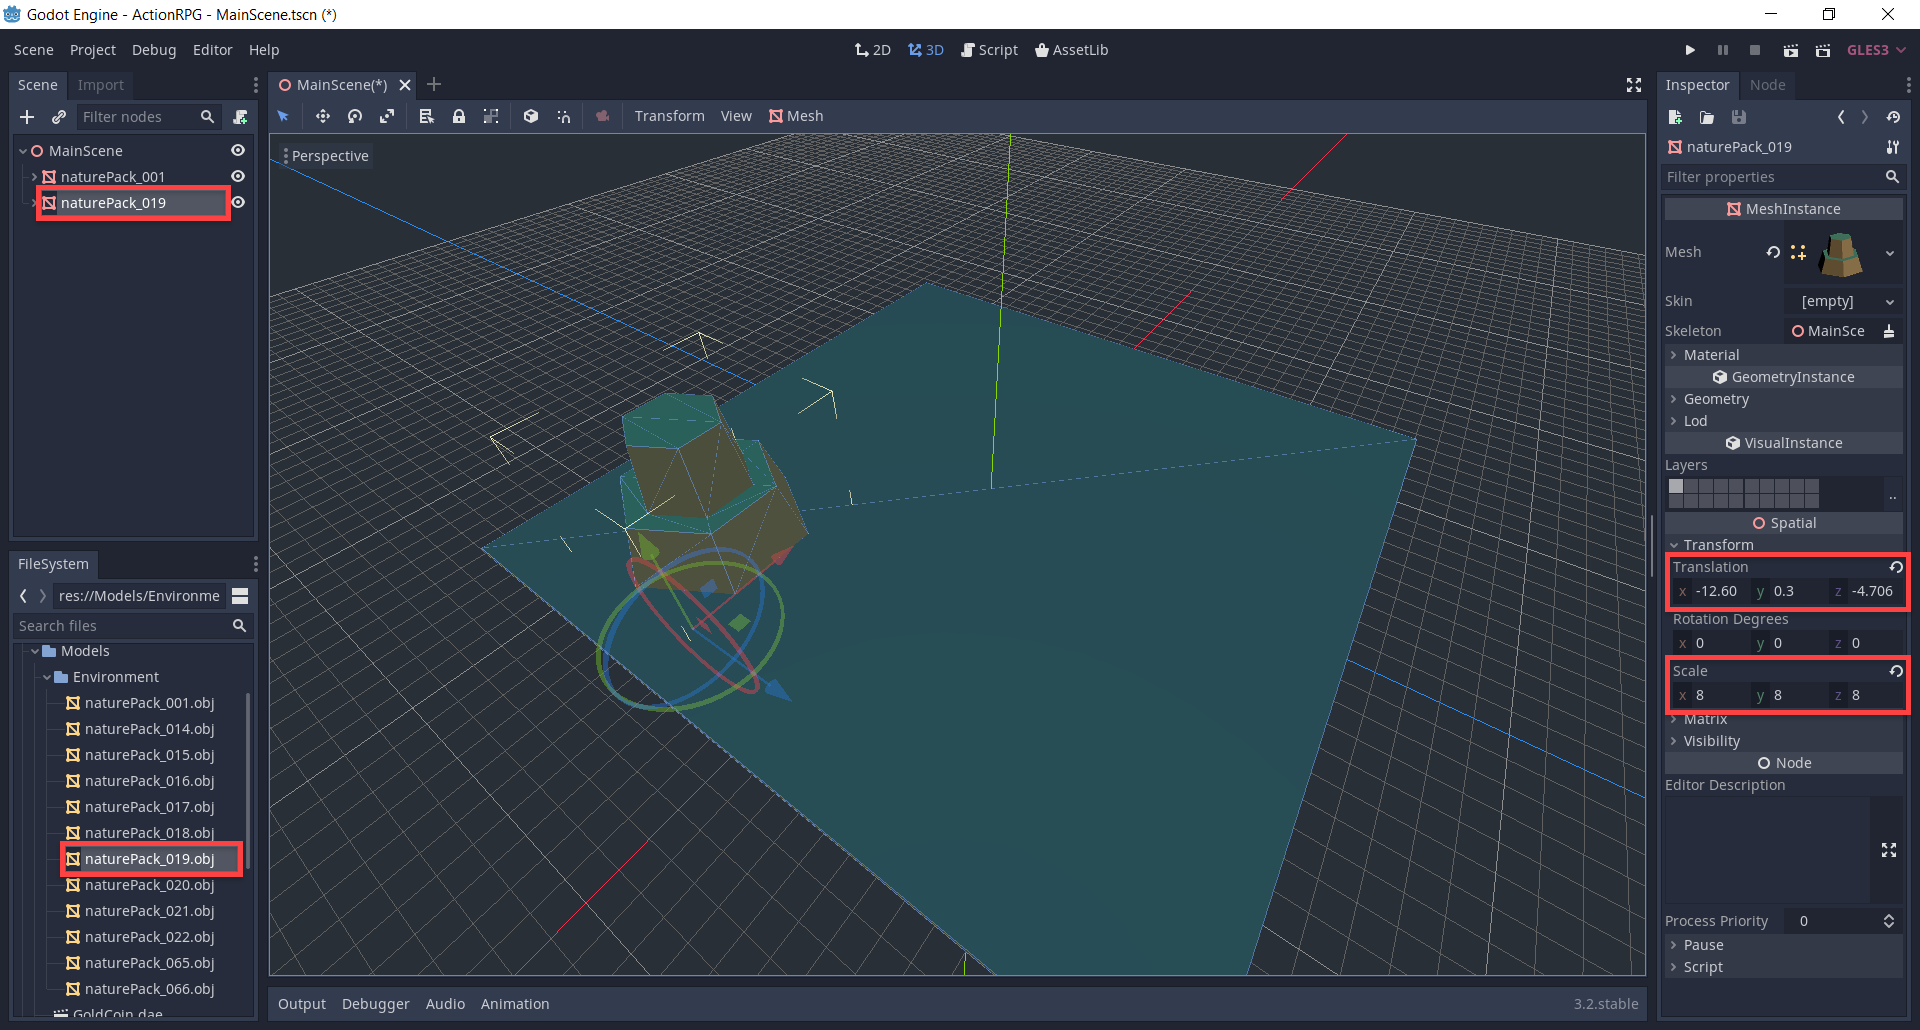
Now that we have the ground, let’s drag in the naturePack_019.obj model.
- Give it a collider Mesh > Create Trimesh Static Body
- Set the Translation to -12.6, 0.3, -4.7
- Set the Scale to 8, 8, 8
We can then drag in more models, assign colliders to them and scale/position the nodes to create a nice looking environment.
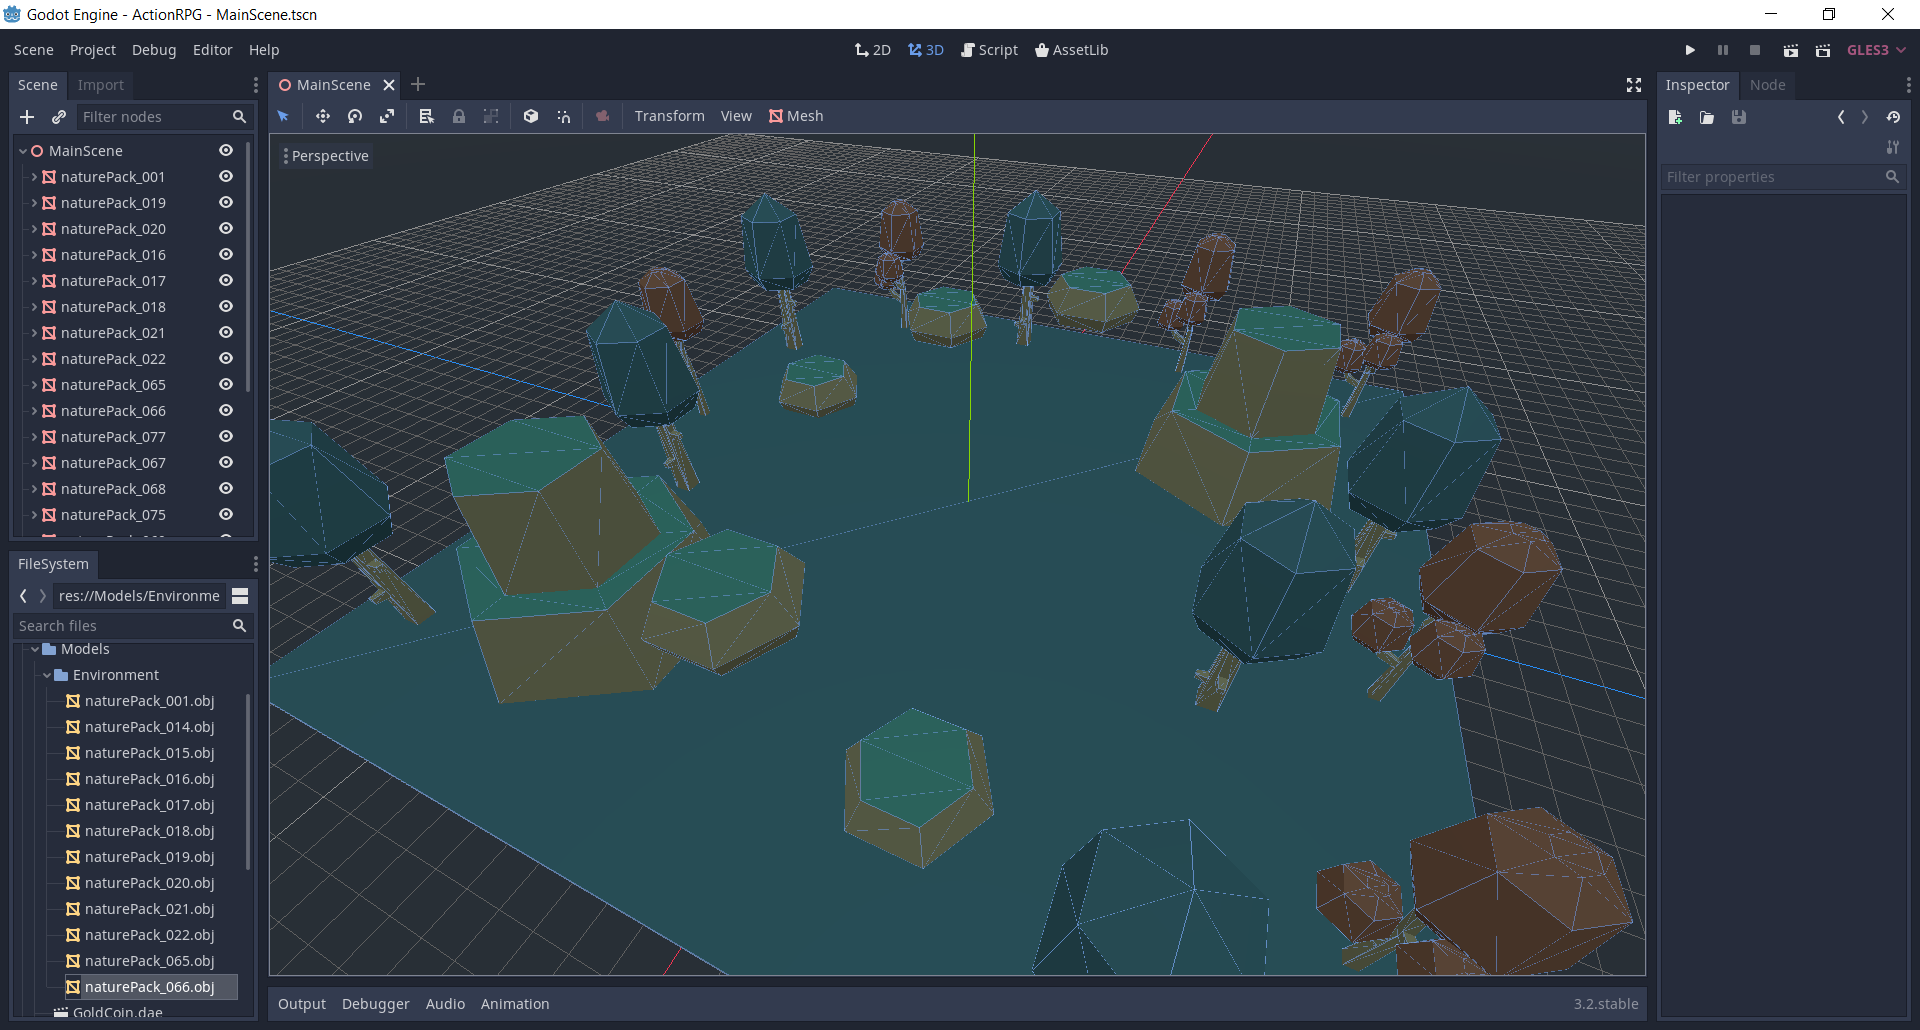
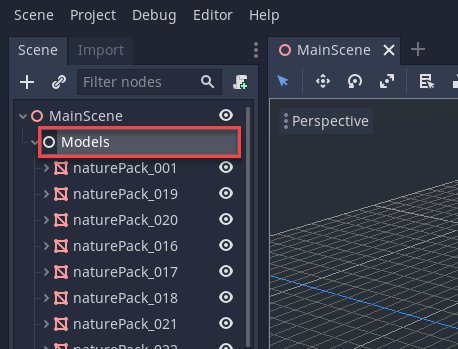
One thing you might notice is that the hierarchy is looking quite cluttered with all of these models. To fix this, we can create a new Node node and drag the models in as a child. This is the most simplistic type of node and is good for containers. We can then retract and expand the node when we need to.
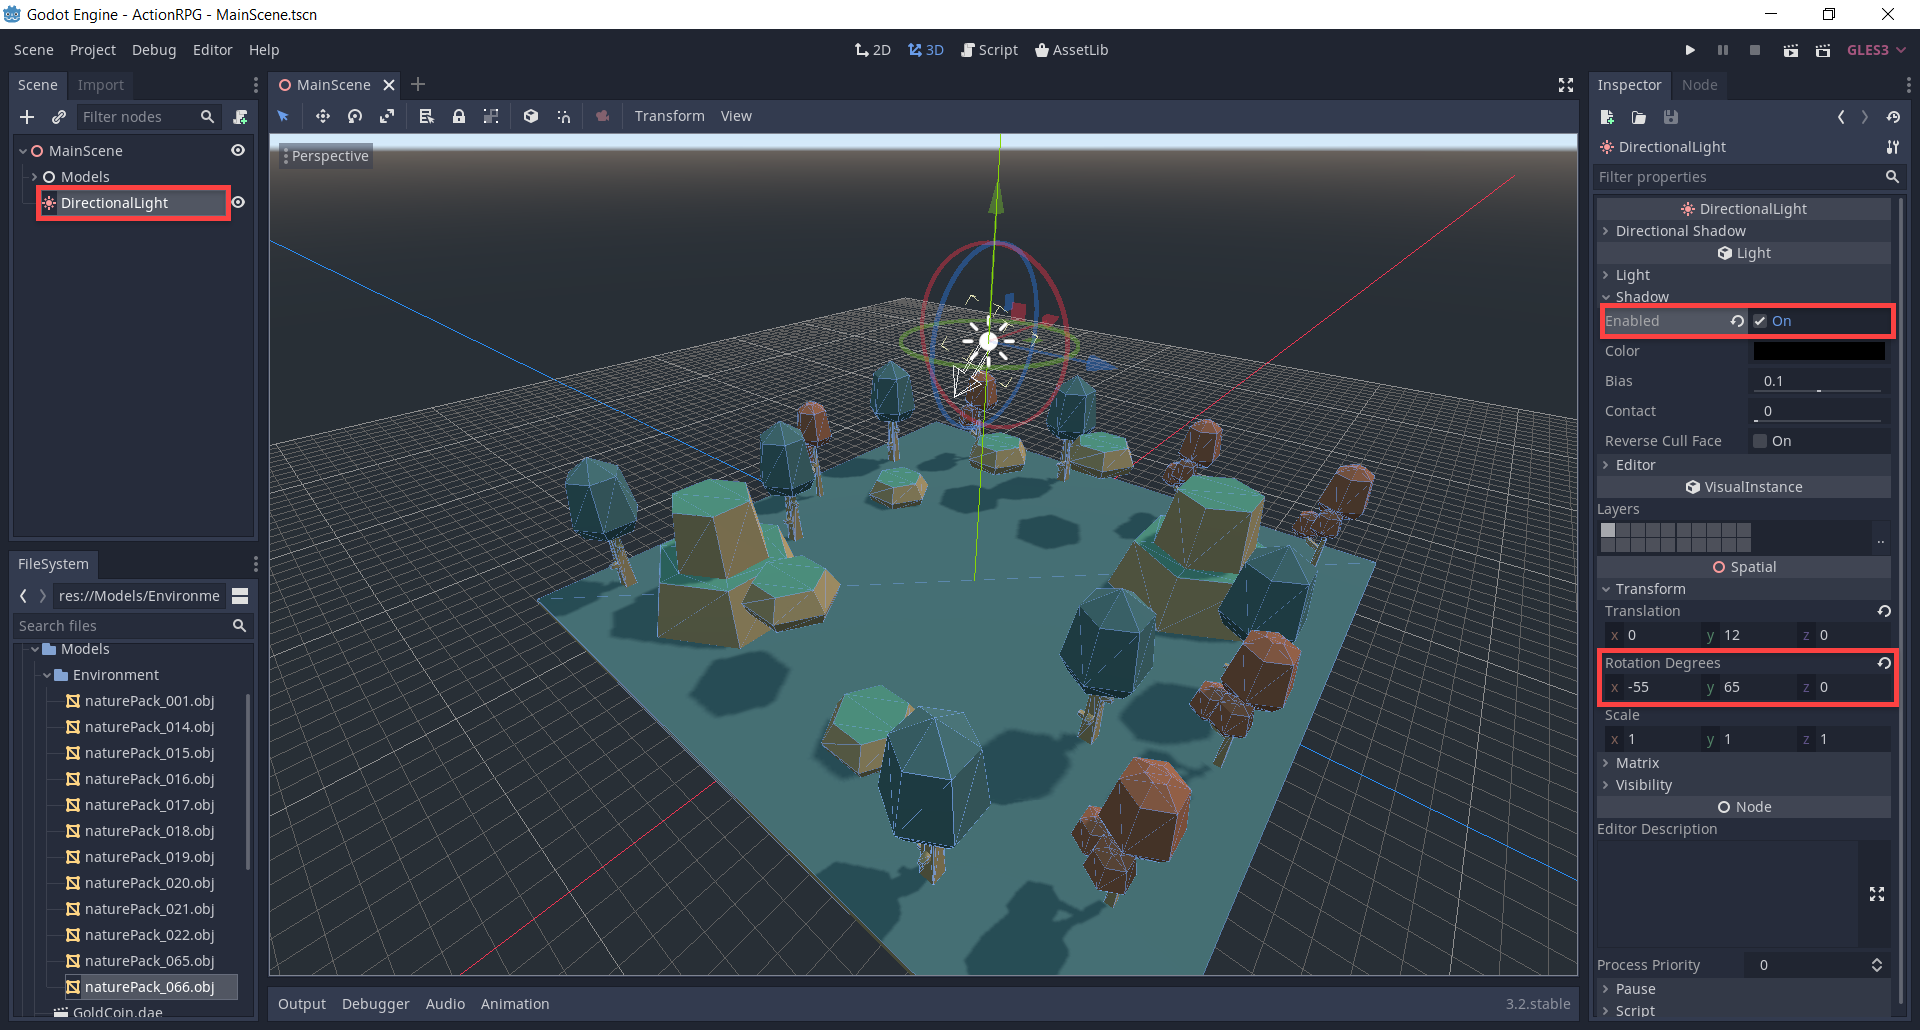
Another thing you may notice is that it’s quite dark. To fix this, we can create a DirectionalLight node which acts as our sun.
- Set the Rotation Degrees to -55, 65, 0
- Enable Shadow > Enabled
Now we have light.
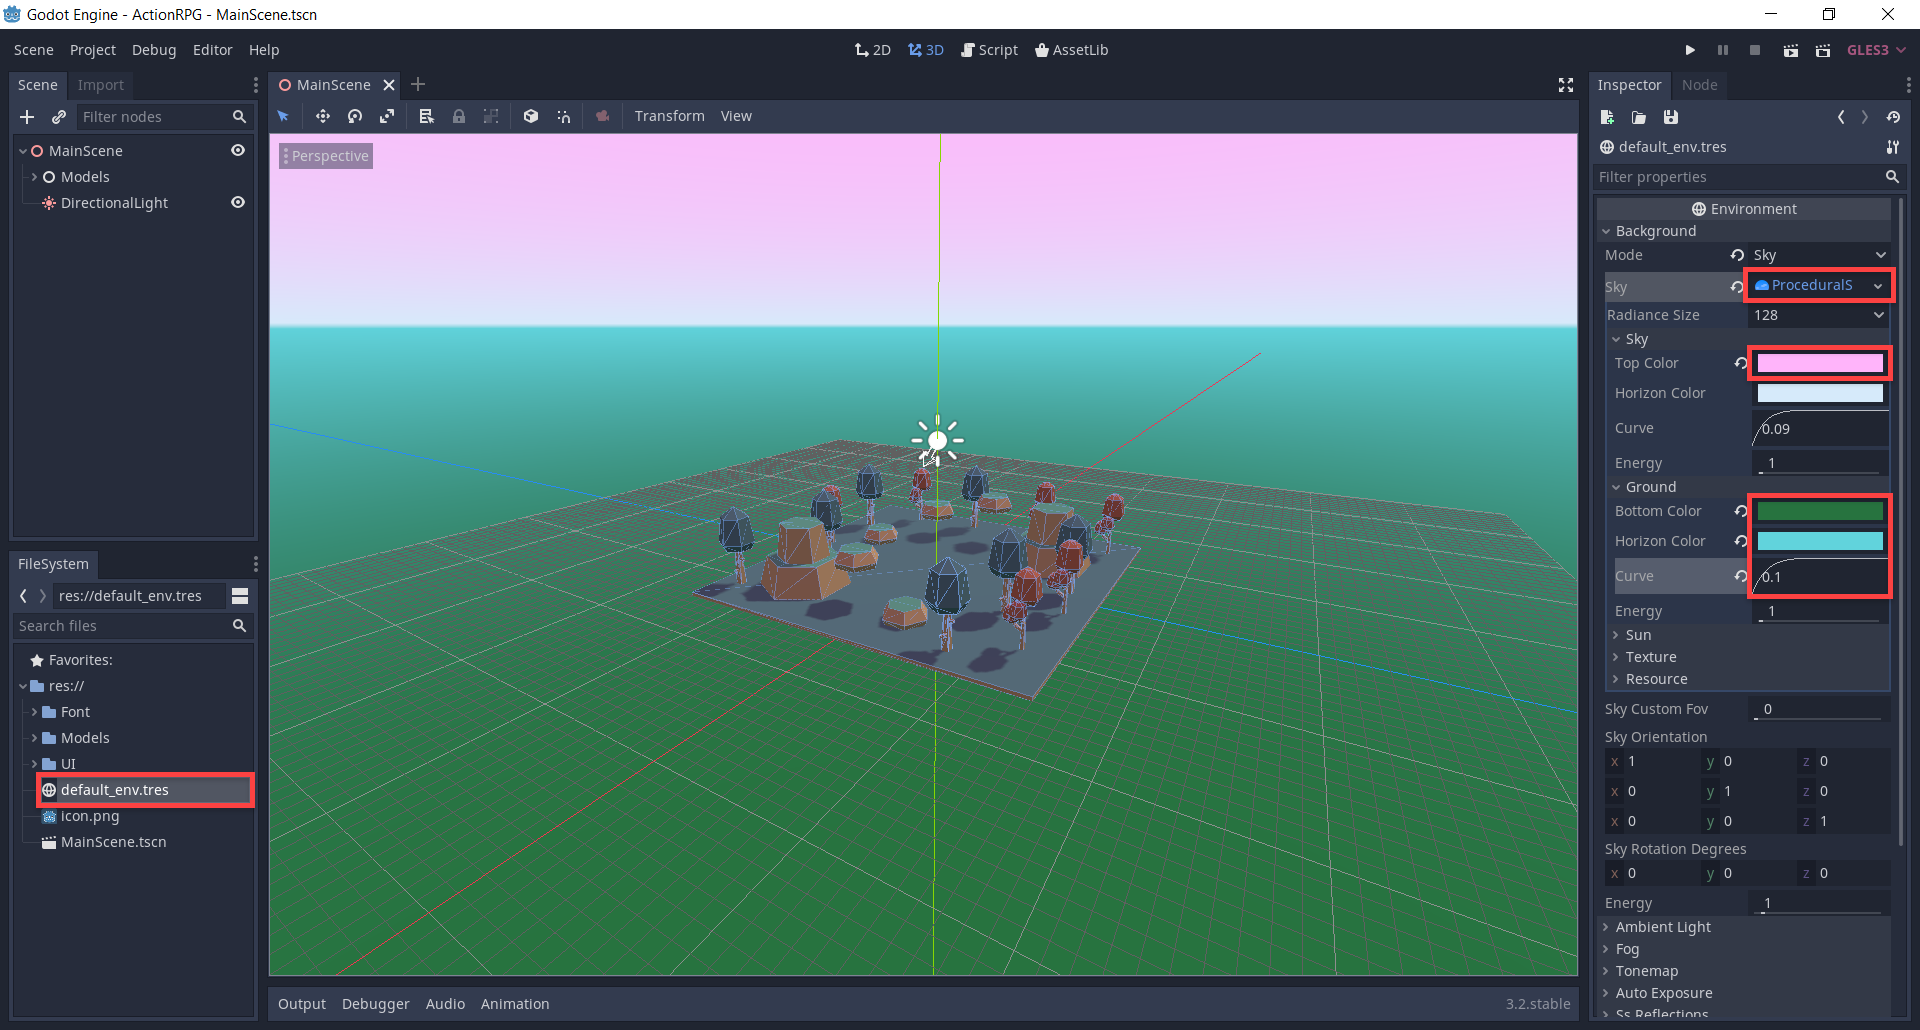
Along with this, let’s make the skybox look a bit nicer. Double click on the default_env.tres resource in the FileSystem to open up the options in the inspector.
- Click on the Sky property to edit the skybox
- Set the Top Color to pink
- Set the Bottom Color to green
- Set the Horizon Color to blue
- Set the Curve to 0.1
Creating the Player
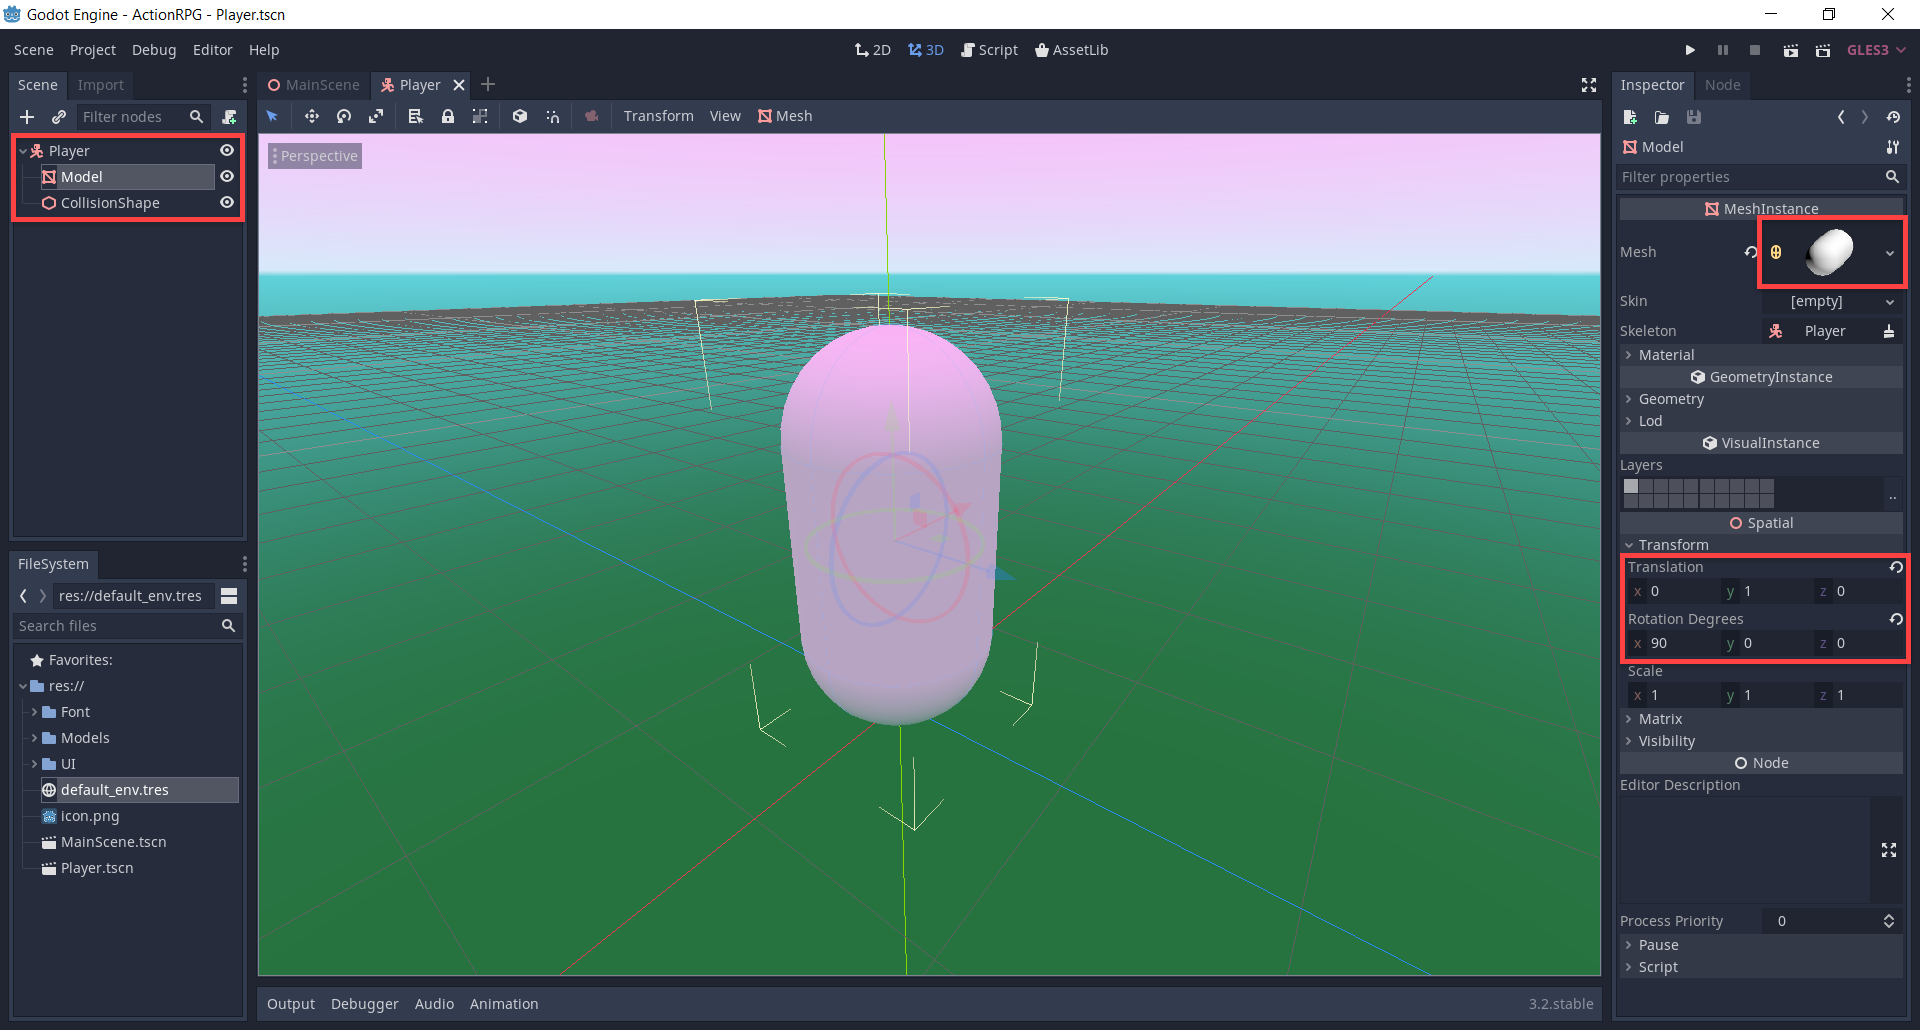
Create a new scene with a root node of KinematicBody. This is a node for physics objects you want to walk around like a player or enemy.
- As a child, create a new MeshInstance node
- Set the Mesh to a Capsule
- Set the mesh Radius to 0.5
- Set the Translation to 0, 1, 0
- Set the Rotation Degrees to 90, 0, 0
- Another child is the CollisionShape node
- Have the same properties as the mesh node
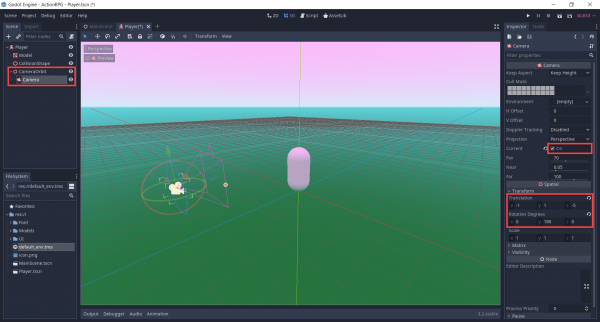
For the camera, we’re going to have a center node with the camera as the child.
- Create a new Spatial node and rename it to CameraOrbit
- Set the Translation to 0, 1, 0
- As a child of that, create a new Camera node
- Enable Current
- Set the Translation to -1, 1, -5
- Set the Rotation Degrees to 0, 180, 0
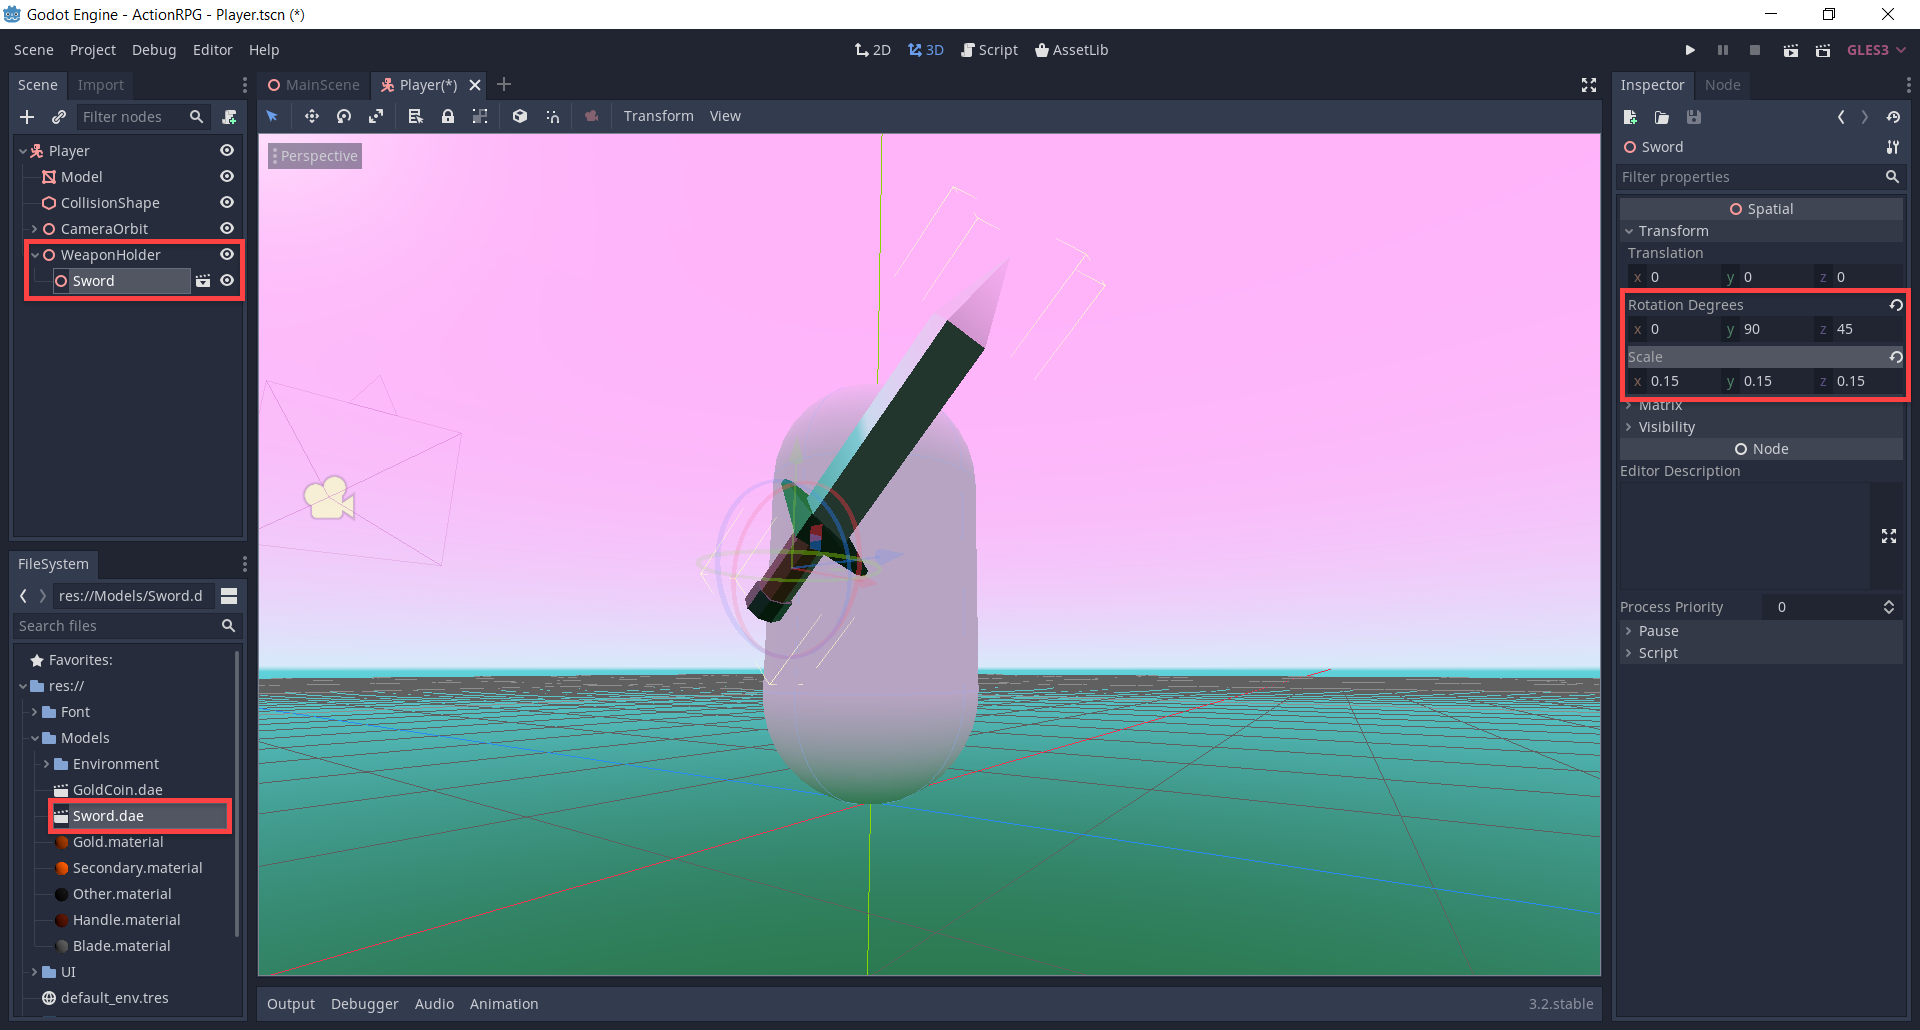
For the sword, we’re going to create a Spatial node called WeaponHolder. This will hold the sword model.
- Set the Translation to -0.58, 1, 0.035
As a child of this node, drag in the Sword.dae model.
- Set the Rotation Degrees to 0, 90, 45
- Set the Scale to 0.15, 0.15, 0.15
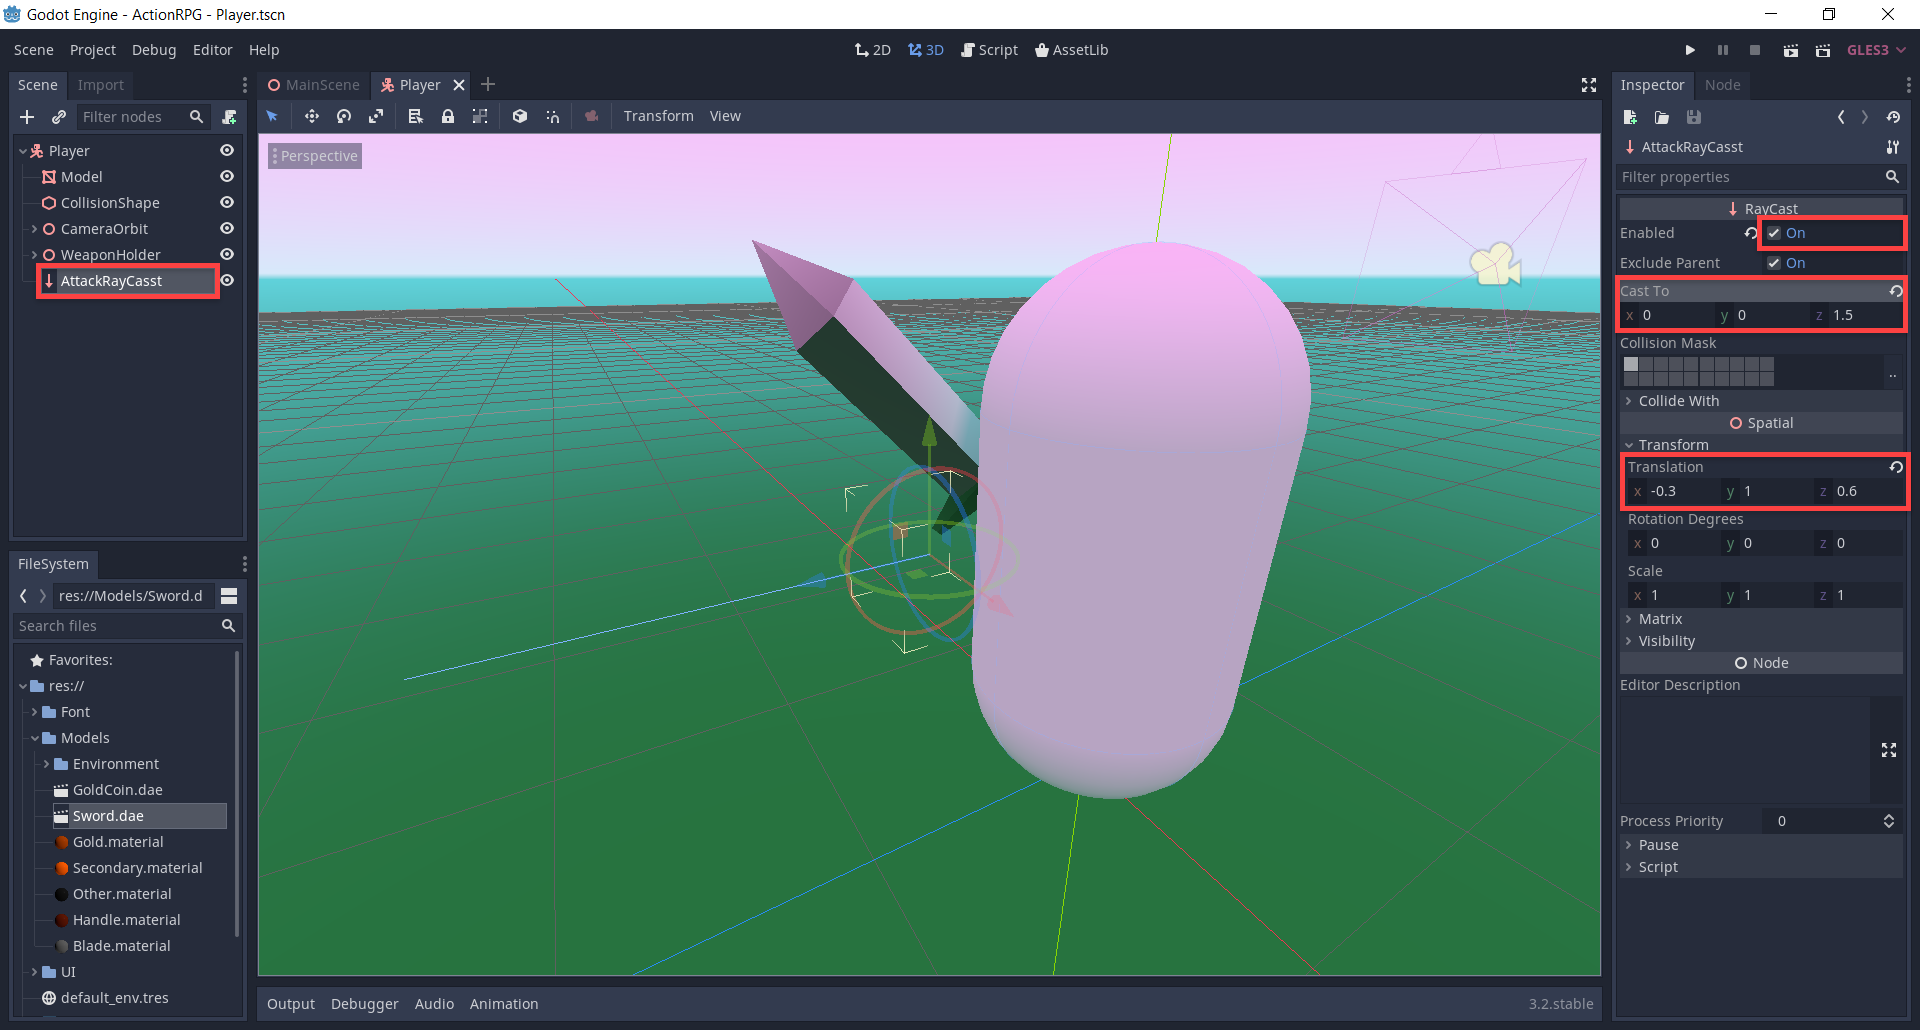
For when we want to attack enemies, we’ll need to create a RayCast node. Rename it to AttackRayCast. This shoots a point from a certain position in a direction and we can get info on what it hits.
- Enable Enabled so that the ray will work
- Set the Cast To to 0, 0, 1.5
- Set the Translation to -0.3, 1, 0.6
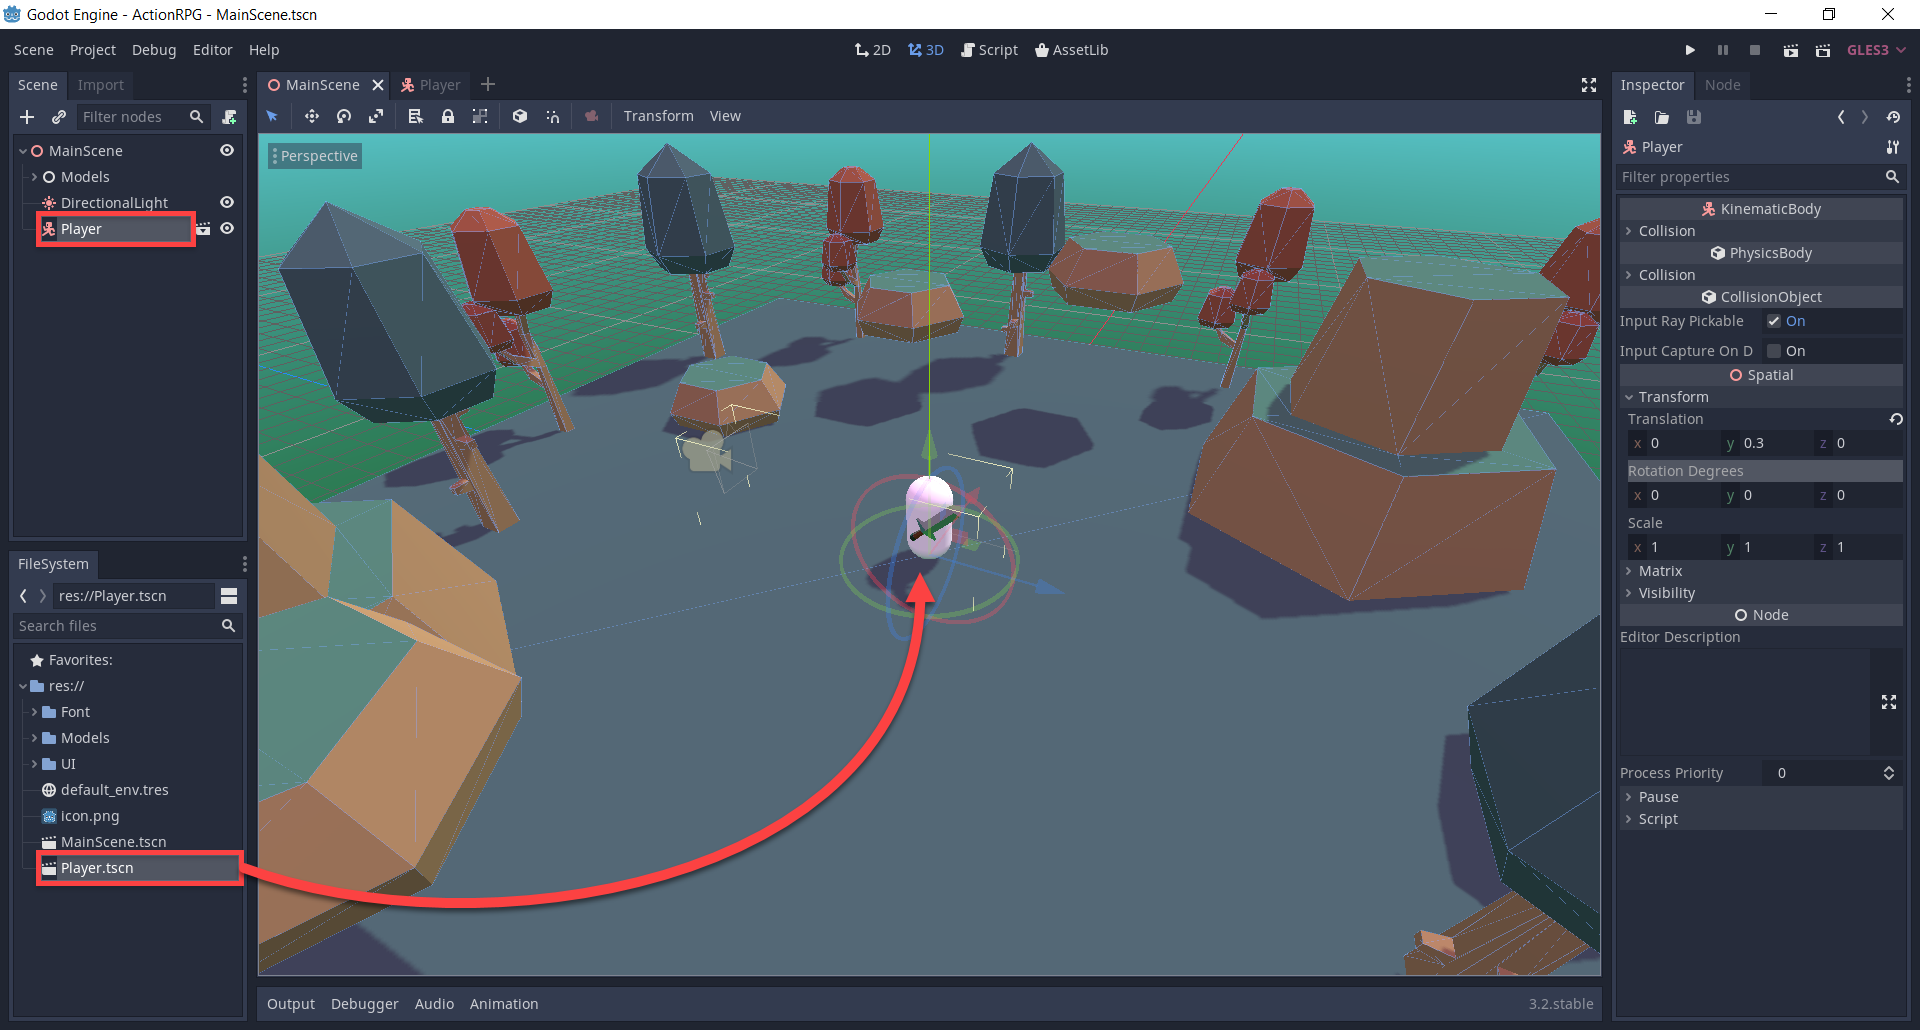
Back in the MainScene, let’s drag in the Player scene.
Camera Look
Now that we’ve got our player object, let’s start to script the camera look system. In the Player scene, select the CameraOrbit node and create a new script called CameraOrbit. We can start with the variables.
# look stats
var lookSensitivity : float = 15.0
var minLookAngle : float = -20.0
var maxLookAngle : float = 75.0

# vectors
var mouseDelta = Vector2()

# components
onready var player = get_parent()
The _input function gets called when any input is detected (keyboard, mouse key, mouse movement, etc). We want to check if the mouse moved, and if so – set the mouse delta.
# called when an input is detected
func _input (event):

    # set "mouseDelta" when we move our mouse
    if event is InputEventMouseMotion:
        mouseDelta = event.relative
Inside of the _process function (called every frame), we’re going to rotate the camera vertically and rotate the player horizontally. Rotating the player separately makes it easier later on to figure out movement directions.
# called every frame
func _process (delta):

    # get the rotation to apply to the camera and player
    var rot = Vector3(mouseDelta.y, mouseDelta.x, 0) * lookSensitivity * delta

    # camera vertical rotation
    rotation_degrees.x += rot.x
    rotation_degrees.x = clamp(rotation_degrees.x, minLookAngle, maxLookAngle)

    # player horizontal rotation
    player.rotation_degrees.y -= rot.y

    # clear the mouse movement vector
    mouseDelta = Vector2()
Finally, we can lock and hide the mouse cursor in the _ready function.
# called when the node is initialized
func _ready ():

    # hide the mouse cursor
    Input.set_mouse_mode(Input.MOUSE_MODE_CAPTURED)
Now if we press play, it’s going to ask us to select a base scene. Choose the MainScene then we can test out the camera orbit system.
Scripting the Player
Let’s now get working on our player. Create a new script called Player attached to the Player node. We can start with the variables.
# stats
var curHp : int = 10
var maxHp : int = 10
var damage : int = 1

var gold : int = 0

var attackRate : float = 0.3
var lastAttackTime : int = 0

# physics
var moveSpeed : float = 5.0
var jumpForce : float = 10.0
var gravity : float = 15.0

var vel = Vector3()

# components
onready var camera = get_node("CameraOrbit")
onready var attackCast = get_node("AttackRayCast")
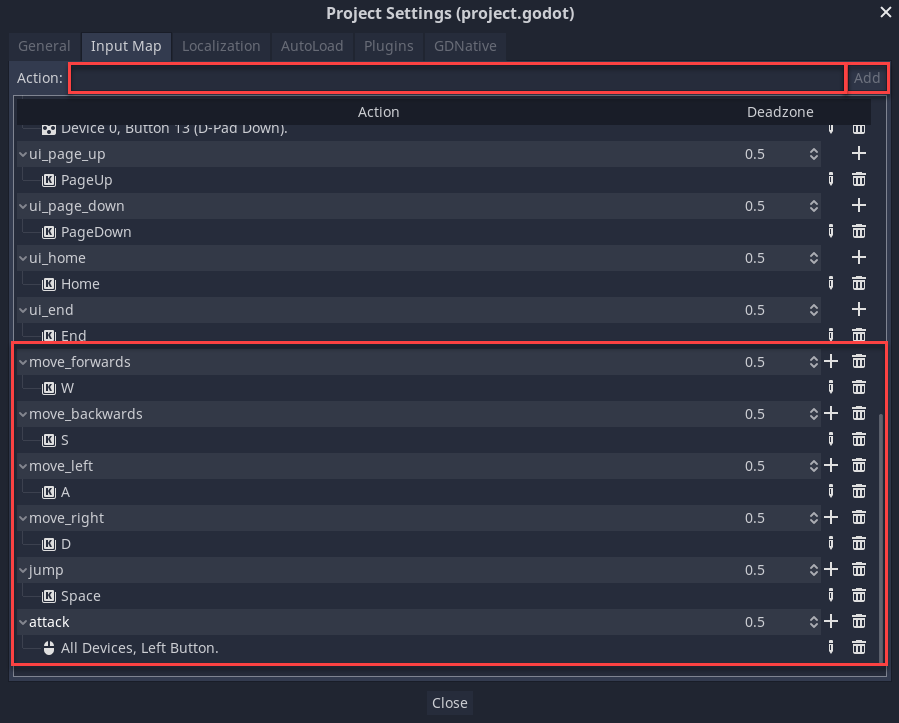
Now we’re going to be detecting keyboard inputs and basing the movement on that. In order to get these inputs though, we need to create actions. Let’s go to the Project Settings window (Project > Project Settings…) then go to the Input Map tab.
Here, we want to enter in an action name and add it. Then assign a key to that action. We need 6 different actions.
- move_forwards
- Key = W
- move_backwards
- Key = S
- move_left
- Key = A
- move_right
- Key = D
- jump
- Key = Space
- attack
- Mouse Button = Left Button
Back in our script, we can create the _physics_process function. This is built into Godot and gets called 60 times a second – this is good for doing physics calls.
# called every physics step (60 times a second)
func _physics_process (delta):
Inside of this function, we’re first going to reset the x and z axis’ of our velocity vector and create a new vector to store our inputs.
vel.x = 0
vel.z = 0

var input = Vector3()
Then we can detect our movement actions and modify the input vector.
# movement inputs
if Input.is_action_pressed("move_forwards"):
    input.z += 1
if Input.is_action_pressed("move_backwards"):
    input.z -= 1
if Input.is_action_pressed("move_left"):
    input.x += 1
if Input.is_action_pressed("move_right"):
    input.x -= 1
With our input vector, we want to normalize it. This means resizing the vector to a magnitude (x + y + z = magnitude) of 1. Because when we move forward, our input vector is (0, 0, 1) with a magnitude of 1. Yet when we move diagonally (1, 0, 1) we have a magnitude of 2. We move faster diagonally, so reducing our diagonal input vector to something like (0.5, 0, 0.5) will maintain a magnitude of 1.
# normalize the input vector to prevent increased diagonal speed
input = input.normalized()
Now since we can look around and rotate, we don’t want to move along the global direction. We need to find our local direction.
# get the relative direction
var dir = (transform.basis.z * input.z + transform.basis.x * input.x)
Next, we can apply this to our velocity vector.
# apply the direction to our velocity
vel.x = dir.x * moveSpeed
vel.z = dir.z * moveSpeed
So we can move horizontally, but what about gravity?
# gravity
vel.y -= gravity * delta
Along with gravity, we also want the ability to jump.
# jump input
if Input.is_action_pressed("jump") and is_on_floor():
    vel.y = jumpForce
Finally with everything calculated, let’s actually move the player.
# move along the current velocity
vel = move_and_slide(vel, Vector3.UP)
We can now press play and test it out!
Gold Coins
Next up, we’re going to create a coin object which the player can collect.
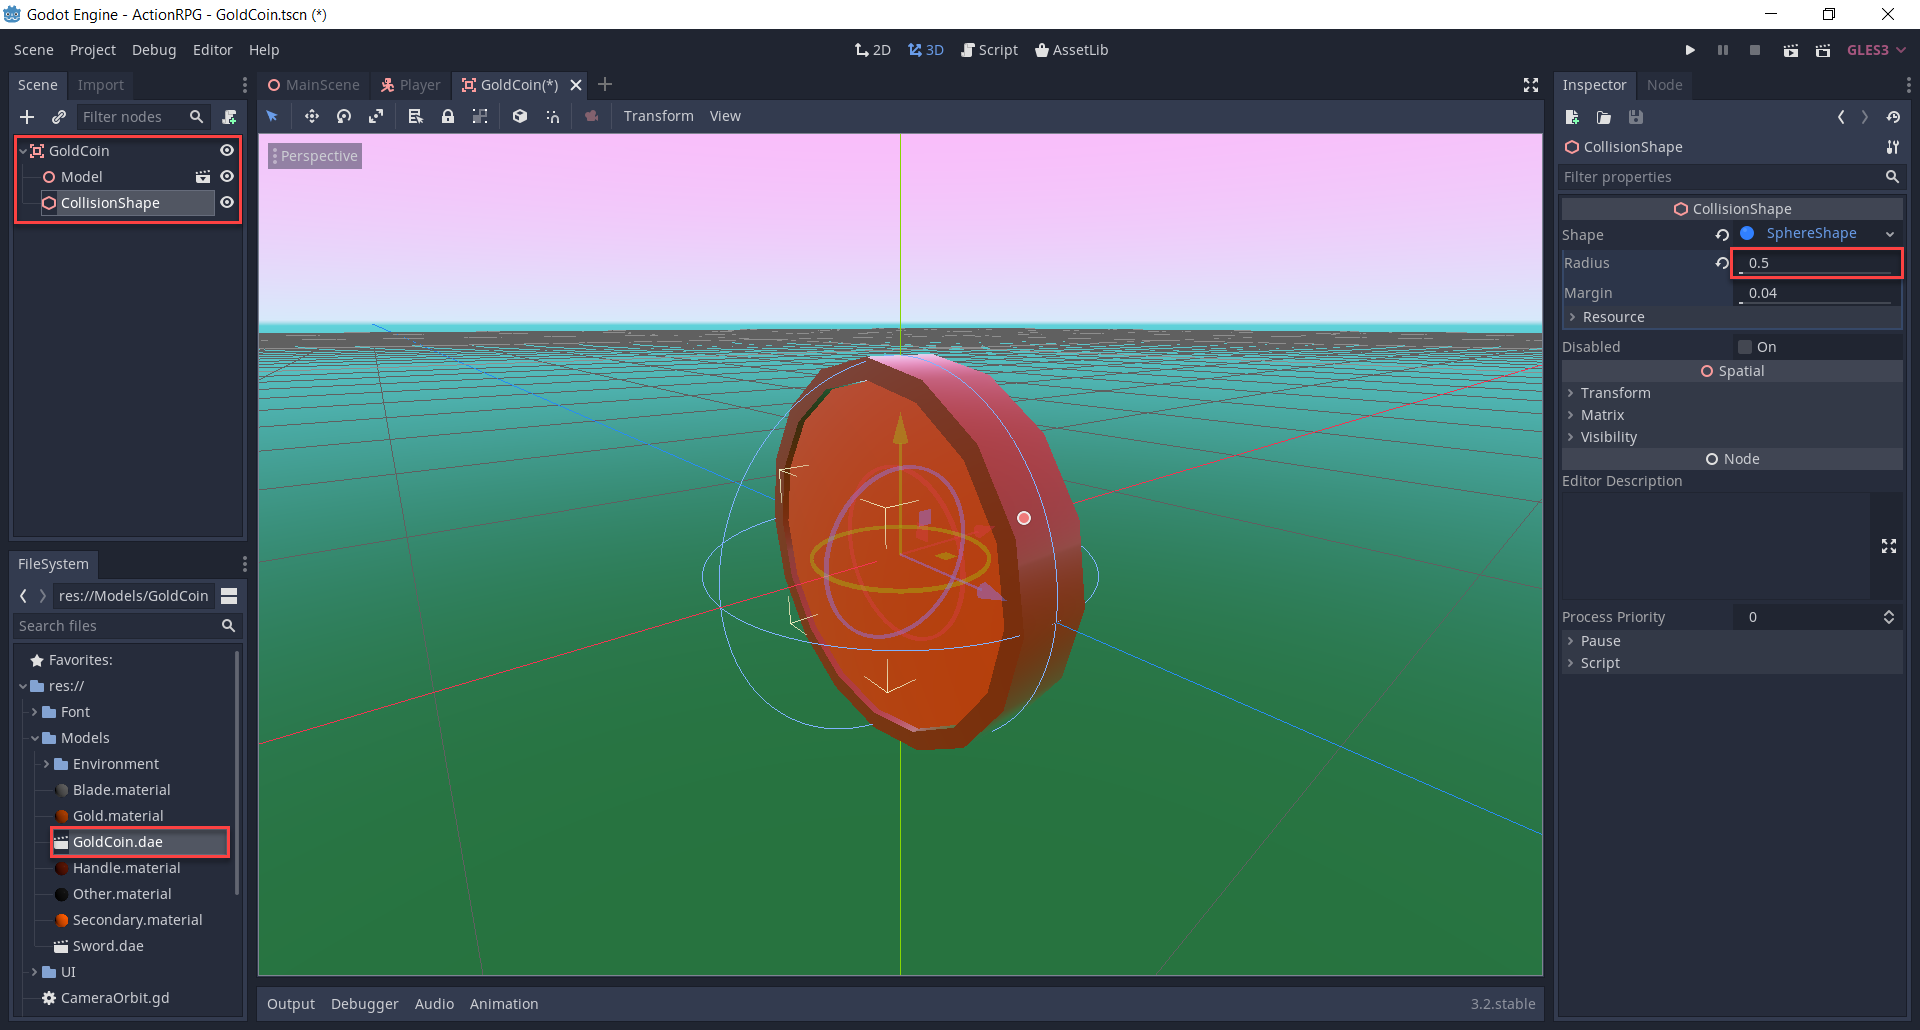
- Create a new scene with a root node of Area
- Rename the node to GoldCoin
- Save it to the file system
- Drag in the GoldCoin model as a child
- Set the Scale to 0.5, 0.5, 0.5
- Create a new CollisionShape node
- Set the Radius to 0.5
Attached to the Area node, create a new script called GoldCoin. First, we can work on our two variables.
export var goldToGive : int = 1
var rotateSpeed : float = 5.0
Inside of the _process function which gets called every frame, we’ll rotate the coin along its Y axis.
# called every frame
func _process (delta):

    # rotate along the Y axis
    rotate_y(rotateSpeed * delta)
In order to detect when the player has entered the coin, we need to connect to a signal.
- Select the GoldCoin node
- In the Node tab, double click on the body_entered signal
- Click Connect and you should see that a new function is created in the script
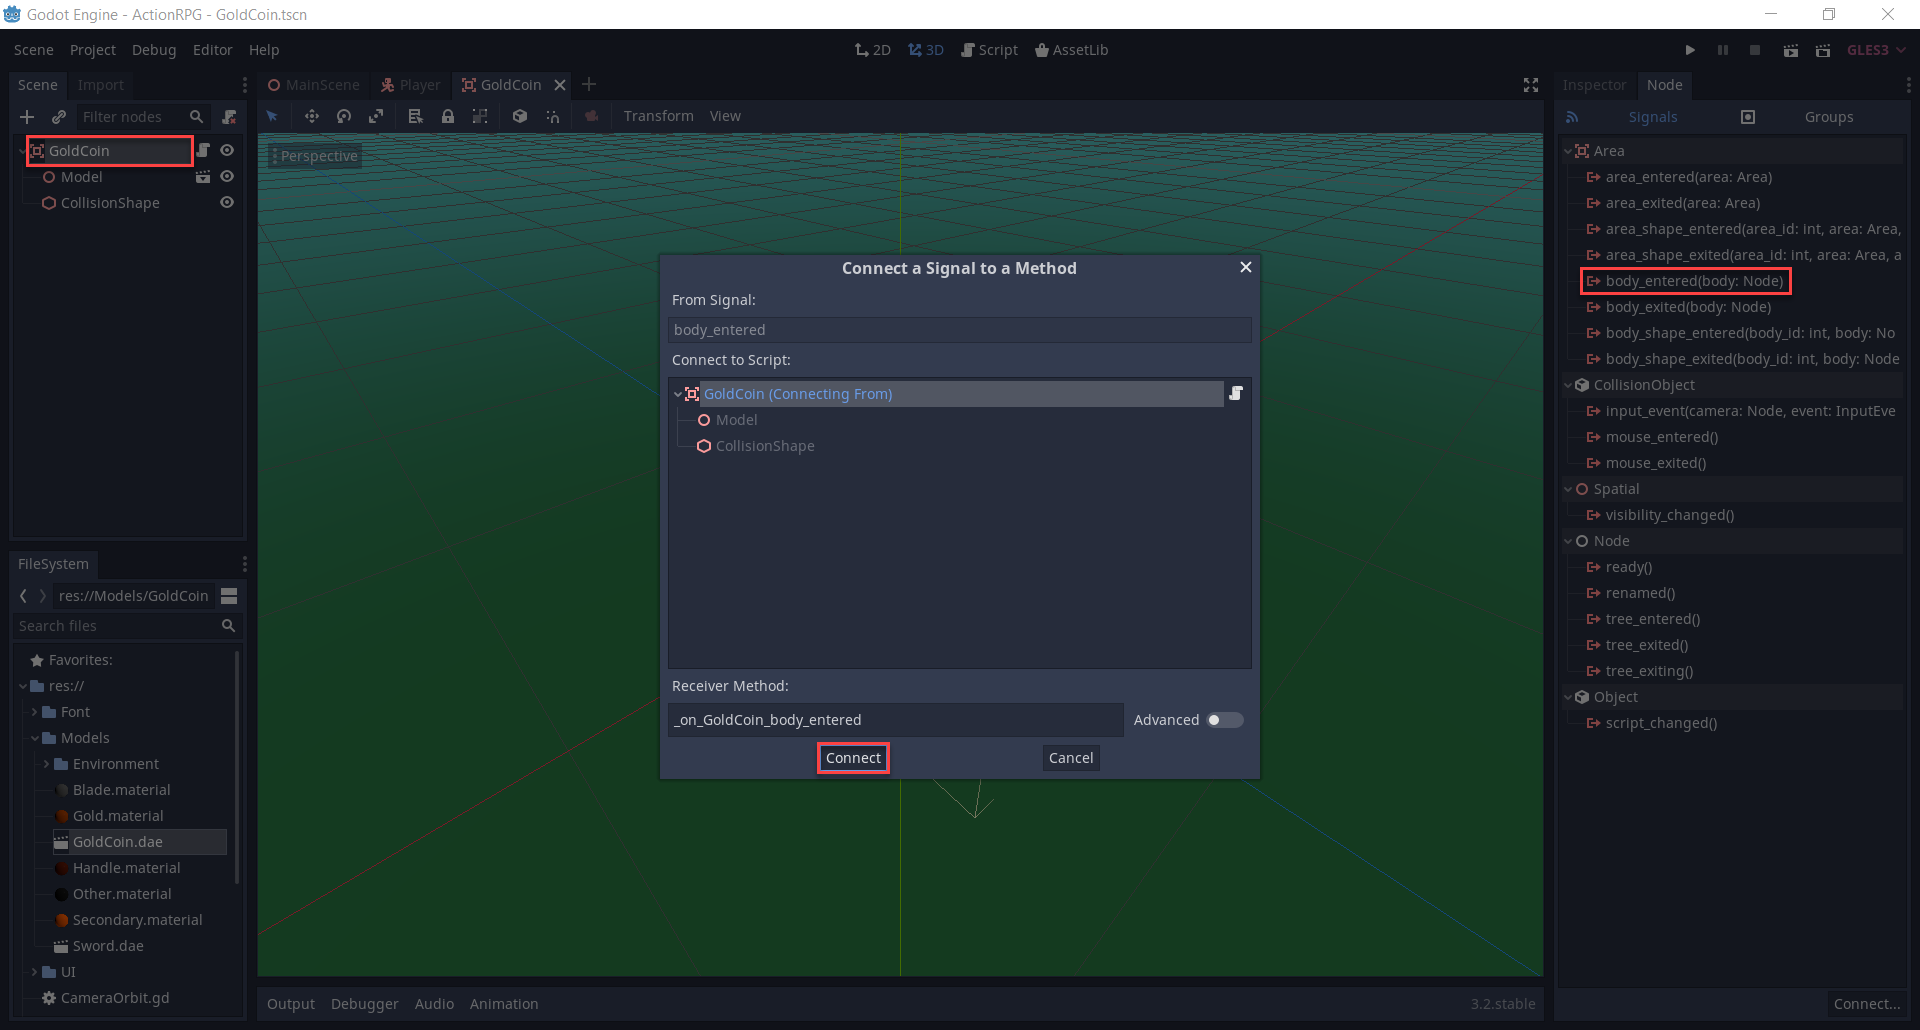
This function gets called when another body enters the coin collider. What we want to do is check to see if the body is the player. If so, call the give_gold function (which we’ll create after) and then destroy the node with queue_free.
# called when a body enters the coin collider
func _on_GoldCoin_body_entered (body):

    # is this the player? If so give them gold
    if body.name == "Player":
        body.give_gold(goldToGive)
        queue_free()
Let’s now create the give_gold function over in the Player script.
# called when we collect a coin
func give_gold (amount):

    gold += amount
Back in our MainScene, let’s drag in the GoldCoin scene. Duplicate it multiple times to create a number of different instances and position them around.
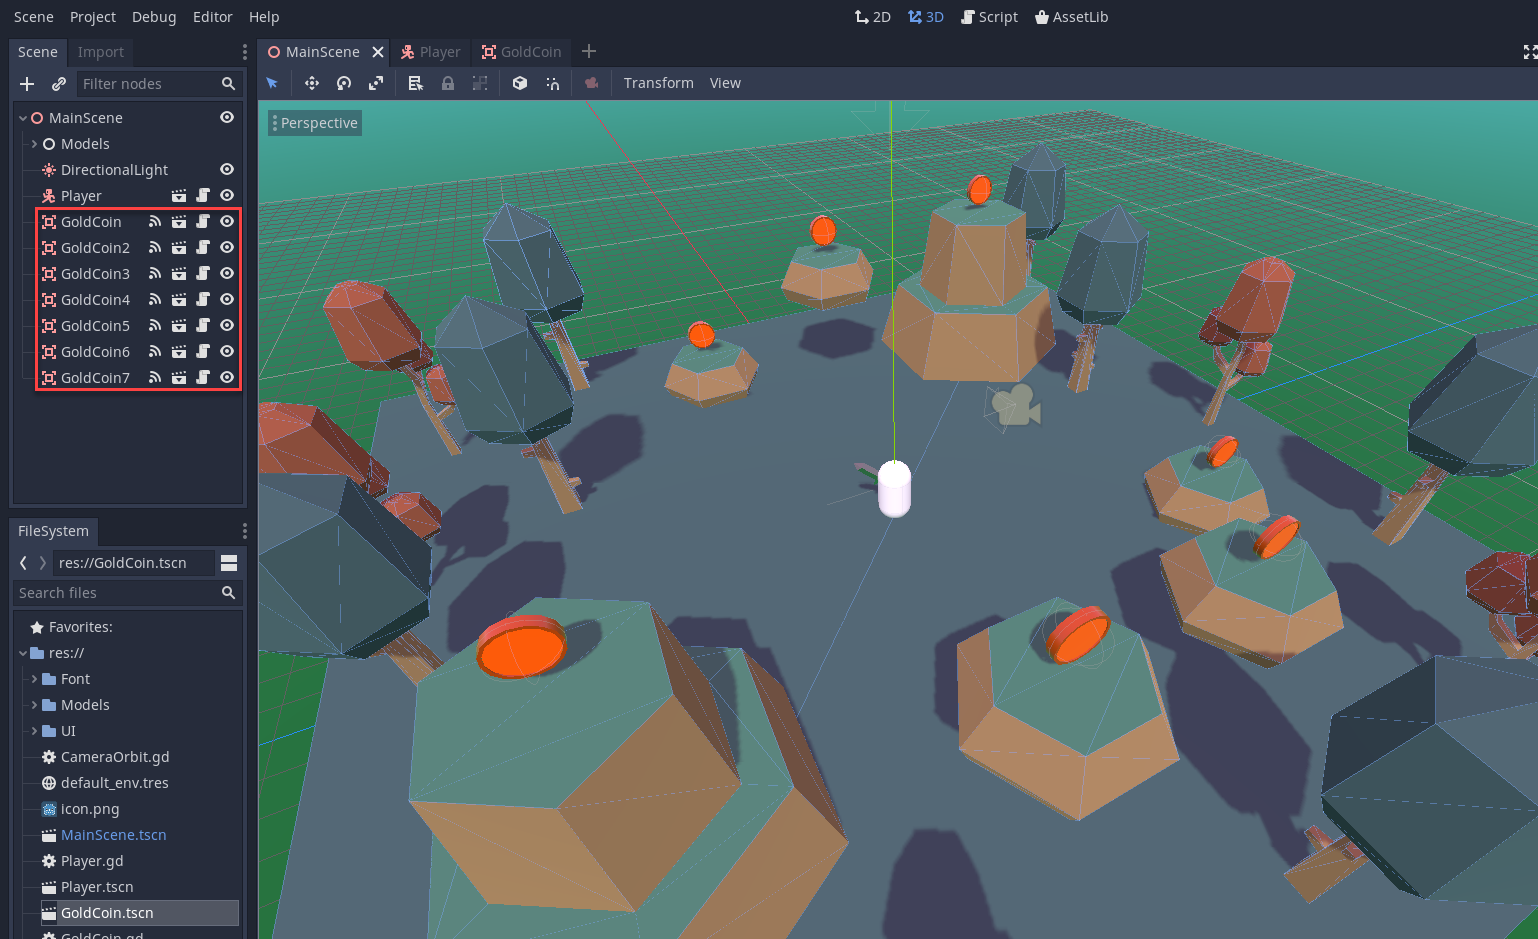
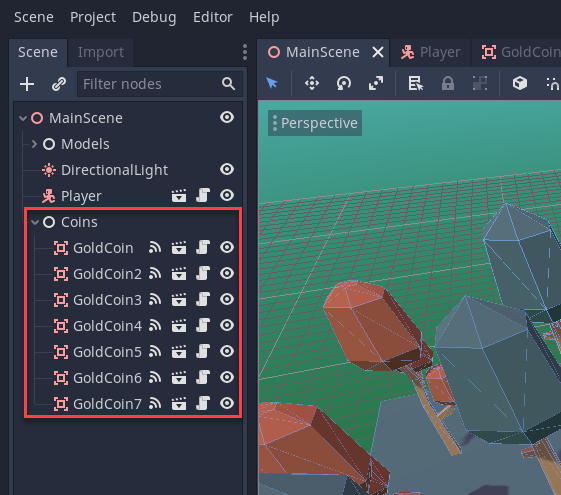
Just like with the models, let’s create a new empty Node and make the coins a child of it. This will act as a sort of container to make the scene hierarchy less cluttered.
Continued in Part 2
So far, we’ve created a player with a sword, scripted our player to move, and even set up our various coins that the player will try to collect. To boot, we also set up our camera so that it can follow the player. While some aspects certainly are playable in this state, our 3D action RPG is definitely not complete! After all, what is an RPG without some enemies and obstacles to face off against?
In Part 2, we’ll finish up this 3D action RPG project by setting up our enemies, animating our sword for combat, and implementing our UI. In so doing, we’ll have a solid foundation for an RPG that can be expanded upon as you wish! Until the next part!
